What is a DIY Drone and How to Build One Step by Step Guide
In recent years, the DIY drone market has experienced exponential growth, fueled by advancements in technology and a burgeoning community of hobbyists eager to explore the skies. According to a report by MarketsandMarkets, the global drone market is projected to reach $42.8 billion by 2024, with a significant portion attributed to the increasing interest in DIY drones. This burgeoning sector not only attracts enthusiasts but also serves educational purposes, allowing individuals to acquire valuable skills in engineering and programming while experiencing the hands-on thrill of building and piloting their own airborne devices.
Building a DIY drone involves understanding core principles of aerodynamics, electronics, and software. Enthusiasts can select from a variety of components and kits, enabling them to customize their drones according to specific needs or preferences. Reports from the Federal Aviation Administration (FAA) indicate that the number of registered drones in the United States has exceeded 1.7 million, underscoring the popularity and accessibility of drone technology. This guide aims to simplify the process of creating a DIY drone, providing step-by-step instructions that empower individuals to harness this exciting technology, explore their creativity, and contribute to the ever-expanding hobbyist community.
Understanding the Basics of DIY Drones and Their Components
DIY drones have gained immense popularity among hobbyists and tech enthusiasts, thanks to the increasing availability of components and resources. Understanding the basics of these unmanned aerial vehicles (UAVs) is crucial for anyone interested in building their own. A typical DIY drone consists of several core components: the frame, motors, flight controller, battery, and propellers. According to a report by Markets and Markets, the global drone market is expected to grow from $22.5 billion in 2020 to $42.8 billion by 2025, indicating a booming interest in both commercial and recreational drone usage.
The frame serves as the drone's structure, providing support for the other components. Materials like carbon fiber or plastic are commonly used for their lightweight yet durable properties. Motors are critical for flight, converting electrical energy from the battery into mechanical energy to spin the propellers. The flight controller, often seen as the brain of the drone, processes inputs from the remote control and stabilizes the vehicle during flight. Furthermore, a report by Statista predicted that the consumer segment of the drone market will reach 5.4 million units by 2024, highlighting the growing trend of DIY drone construction among enthusiasts looking to customize their flying machines.
Essential Tools and Materials Needed for Building a DIY Drone
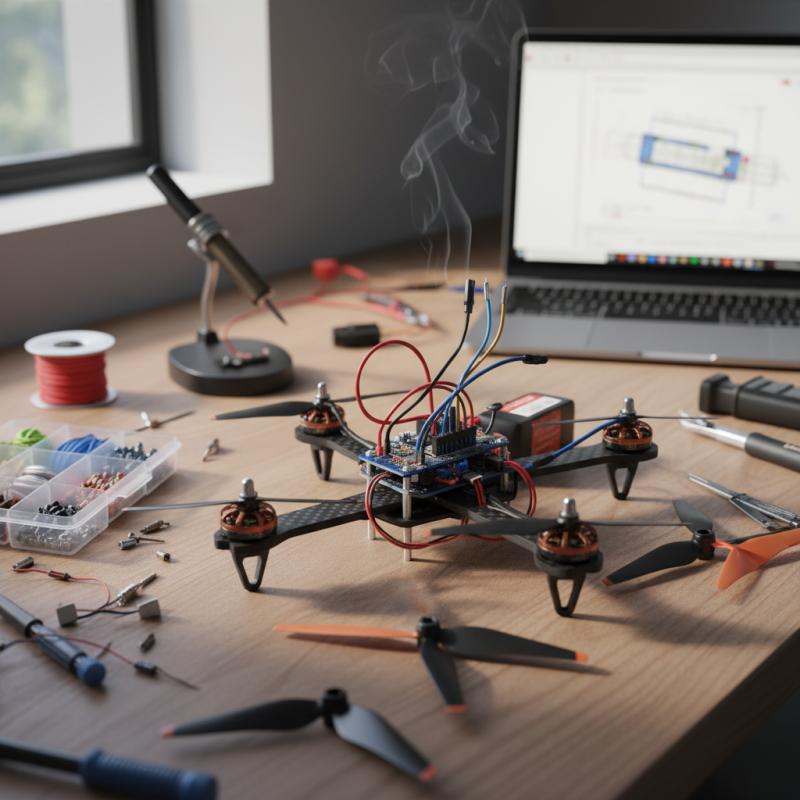
Building a DIY drone can be an exciting project, but having the right tools and materials is crucial for success. First, you'll need a sturdy frame, which can be made from lightweight materials such as plastic or carbon fiber. A well-constructed frame will provide the necessary support for the drone's components and help ensure stability during flight.
In addition to the frame, you'll require essential electronic components. These include motors, electronic speed controllers (ESC), and a flight controller, which will serve as the brain of your drone. Batteries are equally important, as they provide the power needed for flight. Make sure to choose a battery with sufficient capacity to sustain the drone's operation without adding excessive weight. Besides these components, tools such as a soldering iron for connecting wires, screwdrivers for assembly, and propellers to enable lift are also necessary. Collecting these materials and tools will set you on the right path to building an efficient and functional DIY drone.
Step-by-Step Guide to Assembling Your DIY Drone Frame
A DIY drone is an exciting project for hobbyists and tech enthusiasts, allowing them to explore the fundamentals of aerial technology while creating a device tailored to their specific needs. The first step in assembling your DIY drone frame involves choosing the right materials. Lightweight options like carbon fiber or plastic composites are ideal, as they provide the necessary strength without adding unnecessary weight. According to a market report by ResearchAndMarkets, the global drone market is expected to reach $42.8 billion by 2025, emphasizing the growing interest in UAV technology and its applications.
Once you have selected your materials, the next crucial step is cutting and shaping the drone frame. This requires precision to ensure all parts fit together properly, promoting stability during flight. The frame typically consists of four arms extending from a central body where the motors and electronic components will be attached. Industry reports indicate that approximately 60% of drone users prefer custom-built models, highlighting the satisfaction derived from personalizing and optimizing flight characteristics. This customization extends to the choice of propellers and electronic speed controllers, which directly affect the drone's performance and flying experience. With the right assembly skills and attention to detail, creating a DIY drone frame can be a rewarding venture.
What is a DIY Drone and How to Build One Step by Step Guide - Step-by-Step Guide to Assembling Your DIY Drone Frame
| Component |
Description |
Estimated Cost ($) |
| Frame |
The structure that holds all drone components together. |
50 |
| Motors |
Rotors that provide lift and propulsion. |
80 |
| Propellers |
Blades that enable the drone to fly. |
20 |
| Flight Controller |
The brain of the drone that controls its flight. |
100 |
| Battery |
Power source for the drone. |
30 |
| Camera |
Used for capturing photos or videos during flight. |
150 |
| Remote Controller |
Used to operate the drone manually. |
60 |
| GPS Module |
Provides location data for navigation. |
40 |
| Total Cost |
$530 |
Configuring Electronics: Motors, ESCs, and Flight Controllers
When building a DIY drone, configuring the electronics is a crucial step that sets the foundation for your craft’s performance and stability. The three primary components you need to focus on are the motors, electronic speed controllers (ESCs), and the flight controller. Choosing the right motors is essential as they directly influence the drone’s lift and agility. Brushless motors are popular in DIY builds for their efficiency and durability. Assess the weight of your drone and select motors that can provide sufficient thrust by checking their specifications against your design requirements.
Next, the electronic speed controllers (ESCs) play an integral role in regulating the power sent to the motors. They receive signals from the flight controller and adjust the speed of the motors accordingly. It is vital to match the ESCs with both the motor specifications and the battery to ensure optimal performance. Ensure that the ESCs have a suitable current rating to prevent overheating during operation. When connecting the ESCs to the motors, pay close attention to the wiring; incorrect connections can lead to malfunction or damage.
Finally, the flight controller acts as the brain of your drone, processing data from various sensors and making real-time adjustments to maintain stability during flight. Installing the flight controller involves securing it to your frame and making sure it is well-calibrated. Proper orientation is key, as the flight controller needs to know which way is forward to process the commands accurately. Once all components are connected and configured correctly, you can move on to the software setup, allowing you to fine-tune settings for optimal flight performance.
Testing and Fine-Tuning Your DIY Drone for Optimal Performance
Testing and fine-tuning your DIY drone is a crucial step to ensure it performs optimally and meets your specific needs. According to a recent industry report by the Association for Unmanned Vehicle Systems International (AUVSI), refined flight characteristics can improve a drone's endurance and control efficiency by up to 30%. This highlights the importance of parametric adjustments to factors such as weight distribution, flight speed, and battery optimization during the testing phase.
To begin fine-tuning your DIY drone, you should start with establishing a reliable testing environment. This involves selecting a safe, open area free from obstacles, allowing you to assess the drone's behavior in various flight conditions. Start with basic stability tests—measuring how well your drone maintains its altitude and position. Data collected during these tests can be invaluable, indicating whether the drone requires adjustments in its software settings or physical components, like propeller size or motor power.
After initial testing, it’s essential to focus on metrics such as flight time and responsiveness. Data from a study by the International Journal of Aeronautics shows that drones optimized for weight can achieve an increase in flight time by 20% or more. Iterative testing allows you to gather performance data systematically; for instance, tweaking the center of gravity or experimenting with different payloads can lead to significant increases in efficiency. Balancing all these elements not only enhances the overall performance of your DIY drone but also elevates your skills as a drone builder and pilot.


